
+1 Wings For Eggs All Eggs & Areas: Every Zone in Order
Every area in +1 Wings For Eggs in unlock order, from the Forest and Beach to the Deep Ocean, with the stamina each gap recommends and the eggs it spawns.
FAQ
How many areas are there in +1 Wings For Eggs?
What stamina do I need for the Arctic Zone in +1 Wings For Eggs?
Where do the rarest eggs spawn?
Do the egg spawns ever change?
What is the best egg rarity in +1 Wings For Eggs?
Can I reach every zone without buying wings?
Getting from the starter meadow to the Deep Ocean in +1 Wings For Eggs is a sequence of stamina checks rather than a straight line of islands. Every gap posts its own recommended stamina on a wooden sign, and every area spawns a different egg pool, so the zone you can reach decides the pets you can farm.
 The zone order at a glance: each area opens only after your stamina bar can cover the gap in front of it.
How Area Unlocks Actually Work
Three systems decide whether the next flight succeeds:
- Flight stamina is the hard gate. The bar under your avatar drains while you glide, and the gaps between areas grow wider the further out you go.
- Flight speed builds separately from ring pickups and shop upgrades. It decides how fast you cover a gap, so it changes how much stamina the crossing costs you.
- Wings set the ceiling. Wings never add speed; they multiply the stamina you start each flight with. Stamina upgrades bought at the shop then stack on top of that multiplier.
The requirement is printed in the world rather than hidden in a menu. In the version 1.2 build recorded for this guide, the sign at the Desert Zone reads 34 Stamina recommended, and the Arctic Zone sign reads 46 Stamina recommended. A fresh save starts at 10 Wing Stamina and the first +2 Stamina step at the Upgrades stand is free, so the numbers below are reachable earlier than they look — the cash guide breaks down how wings multiply that bar.
 The Arctic crossing is a stamina budget problem: arrive with a reserve or you land short of the last ridge.
Missing the number is not automatically fatal. A recorded run cleared the Arctic gap with 36 stamina on the bar by taking the high line, then came back for wings before farming it properly. Treat the sign as the comfort threshold, not a locked door.
All Areas in Unlock Order
Stamina values below are either printed on the in-game sign or the value a recorded walkthrough had when it cleared the gap. Treat them as practical targets rather than hard-coded limits.
| # | Area | Gate to enter | Egg pool highlights | Why it is worth the flight |
|---|---|---|---|---|
| 1 | Forest Zone | Starter area (base 10 stamina, Speed 20) | Chicken Egg (Common), Rooster Egg, Brown Mouse Egg (Common) | Fills your first pen slots and unlocks the first Index payouts |
| 2 | Beach Zone | Early wings; cleared at 17 stamina with Speed 42 in the recorded run | Brown Mouse Egg, Ladybug Egg, Mystical Ladybug Egg (Uncommon), Spider Egg (Epic), Lava Chicken Egg (Epic) | Mutation farming starts here, and the nests sit close to the safe zone |
| 3 | Desert Zone | In-game sign: 34 Stamina recommended | Pink Frog Egg (Common), Lion Egg (Mythic), Evil Bunny Egg (Rare) | Cheap nests with a big step up in cash per hatched pet |
| 4 | Arctic Zone | In-game sign: 46 Stamina recommended | Ice Wolf Egg (Mythic), Space Egg, Mystical Dragon Egg | Rare pool with high cash/sec pets and wide gaps that punish a low stamina bar |
| 5 | Volcano Zone | Armored-tier wings; cleared at 57 stamina in the recorded run | Tyrannosaurus Egg, Dragon Egg, secret Cursed Dragon Egg spawns | Rebirth milestone zone, but the nests are heavily contested by other raiders |
| 6 | Void Zone | Roughly 85–95 stamina with Jungle or Skeleton-tier wings | Void Lion Egg (Mythic), Void Phoenix Egg (Eternal), Ghost Horse Egg (Epic) | Eternal eggs spawn here at night and print the biggest early trillions |
| 7 | Cloudlands Zone | Around 140+ stamina; Speed 198 was enough in the recorded run | King Jaguar Egg, King Toucan Egg, Pelican Egg (Mythic) | Top-tier cash/sec pens before the final flight |
| 8 | Deep Ocean Zone | Angelic Wings (2.7x, roughly 270 stamina) | Kraken Egg, Narwhal Egg, Ocean Elephant Egg, Pixel Shark Egg, Poseidon Trial Egg | Best egg in the game and the highest offline income per pen slot |
Egg Pools by Zone
Every zone keeps its own nest list, and the Index records each egg the first time you steal it. The names below are the ones that appear on nest labels and in the Index during the recorded runs.
Forest Zone
The opening area is where the pen economy starts. Chicken Eggs and Brown Mouse Eggs carry the Common tag and hatch in a minute or two, and Rooster Eggs fill the same early slots. A hatched chicken was earning about $4 per second, so the goal here is volume plus the Index payout, not individual pet value.
Beach Zone
The Beach Zone sits one glide past the starter meadow and is the first place mutations show up on cheap eggs. Its Index category covers five eggs in the recorded run: Brown Mouse, Ladybug and Mystical Ladybug (Uncommon), plus Spider and Lava Chicken at Epic rarity. Lava Chicken was listed at $1.98k per second in the Index preview, and the Discovered reward for the category was $190.08k.
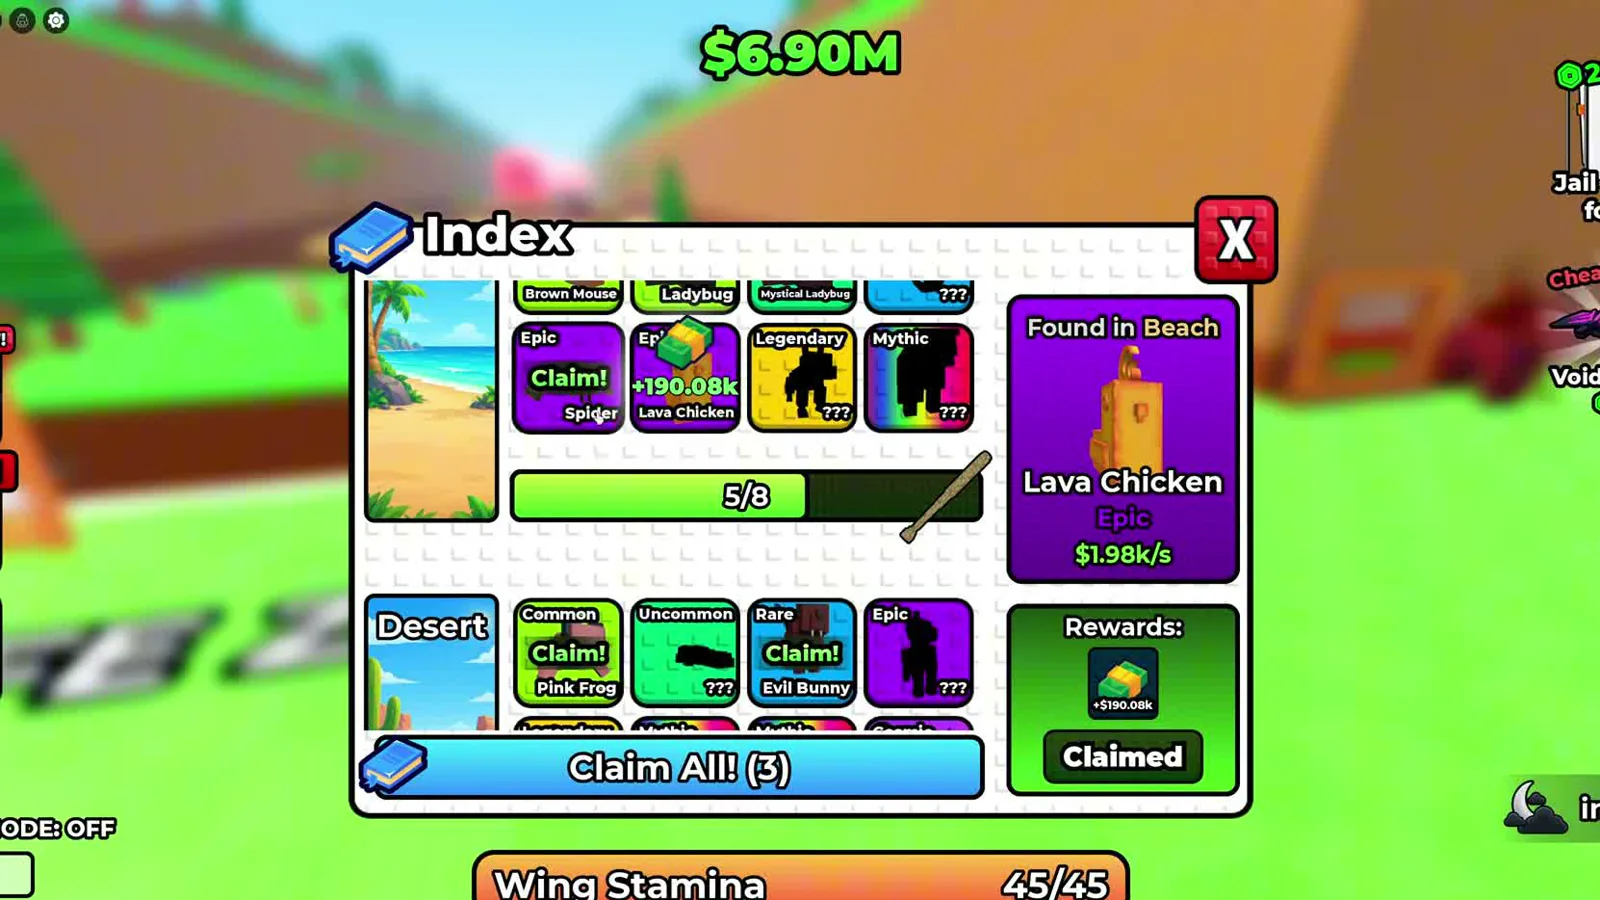 The Index is a second income stream: each new egg entry pays a flat reward, and the category completes as you steal every nest type.
Desert Zone
The 34-stamina sign marks the first real difficulty step. Pink Frog Eggs are the Common entry here, Evil Bunny Eggs carry the Rare tag, and the Lion Egg carries the Mythic tag with a higher growth value than the starter pool. This is the zone where a full pen starts paying for the next wing tier instead of the next pen slot.
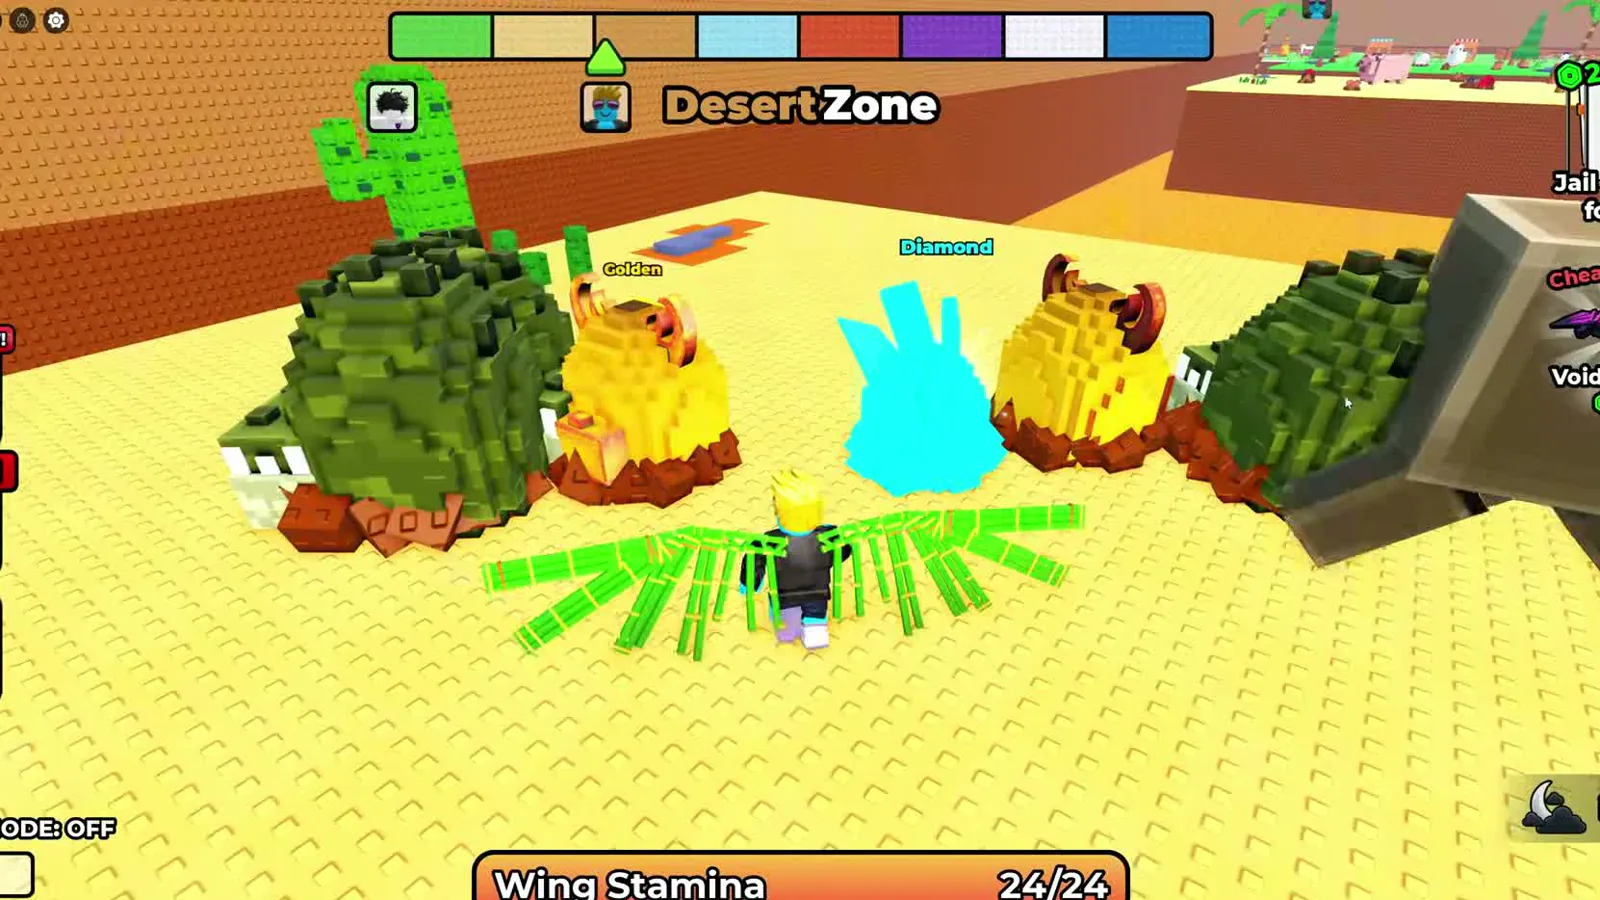 Mutation labels are visible from the air, so scan the nest cluster before you commit to a landing.
Arctic Zone
The Arctic Zone recommends 46 stamina and holds a rare pool: Ice Wolf Eggs at Mythic rarity, Space Eggs and Mystical Dragon Eggs. Two Space Eggs spawning at once happened in one recorded run. The gaps here are wide, so bank the return trip’s stamina before you land rather than after.
Volcano Zone
The Volcano Zone is the rebirth checkpoint from the rest of the wiki, and it is cleared with Armored-tier wings at roughly 57 stamina. Tyrannosaurus Eggs and Dragon Eggs live here, and the game announces secret spawns of its own — a Cursed Dragon Egg spawn message appeared during the recorded run, followed by an egg pool reset.
Void Zone
The Void Zone opens at roughly 85–95 stamina with Jungle or Skeleton-tier wings. Its headline egg is the Void Phoenix Egg with the Eternal tag, which spawns at night and takes 1 hour 24 minutes to hatch; the pet was generating about 1.19 trillion cash per second in the recorded run. Void Lion Eggs carry the Mythic tag, and Ghost Horse Eggs showed the Epic tag in the Index.
Cloudlands Zone
The Cloudlands Zone is the last stop before the ocean floor. King Jaguar Eggs, King Toucan Eggs and Pelican Eggs (Mythic) spawn around these floating platforms, and one run reached the zone with Speed 198 and a stamina bar in the 140–198 range. Pens filled here are what fund the Angelic Wings push.
Deep Ocean Zone
The Deep Ocean is the endgame pool: Kraken Eggs, Narwhal Eggs, Ocean Elephant Eggs, Pixel Shark Eggs and Crocodile Warrior Eggs, plus the event-only Poseidon Trial Egg. Narwhal Eggs were seen with the Lava mutation. The Kraken Egg takes about two hours to hatch, and the Poseidon Trial Egg took 2 hours 59 minutes and produced roughly 3.37 quadrillion cash per second — the strongest pet recorded in these runs. The zone is only practical once Angelic Wings push stamina to roughly 270.
Egg Rarities and Mutations
Rarity is printed on every egg tag and recorded in your Index. Across these runs the tags shown were Common (Chicken, Brown Mouse, Pink Frog), Uncommon (Mystical Ladybug), Rare (Evil Bunny), Epic (Spider, Lava Chicken, Ghost Horse), Legendary (Golden Wolf), Mythic (Lion, Ice Wolf, Pelican) and Eternal (Void Phoenix), which the runs call the best rarity in the game.
 Rarity climbs with distance from the safe zone, but so does the flight time home.
 Hover labels stack rarity and mutation on the same egg, so a Rare nest can out-earn a plain Legendary one.
Mutations are a separate multiplier layered on top of rarity. The following were seen on nest and pen labels in these runs:
| Mutation | Where it was seen | Notes |
|---|---|---|
| Diamond | Desert nests and later Kraken Eggs | The most common value bump on early eggs |
| Golden | Wolf Egg in the pen and early Desert nests | Turns a Legendary pet into a much higher cash/sec entry |
| Lava | Narwhal Egg in the Deep Ocean | Appears during the lava event window |
| Splash | Arctic and Void eggs | Roughly a 15% spawn chance on eligible eggs in the recorded run |
| Cosmic | Late-game eggs during speed upgrades | High-tier mutation seen while the third area was open |
| Rainbow | Starter area eggs | Rare colour variant that keeps the base egg’s pool |
Events temporarily replace the normal pool. The Hacker Event, the Space Invader event and the Trials of Poseidon all restock nests with eggs that are not part of the weekday rotation, and the islands visibly reset their spawns afterwards.
Which Eggs Are Worth the Return Flight
- Carry capacity is the limiting factor. You start able to hold a single egg. Upgrades seen in the shop went 1 → 2 for roughly $500k–$600k, 2 → 3 for $300M, and 4 → 5 for $200T.
- Two eggs cost you speed. Carrying a second egg made the avatar noticeably slower in the recorded runs, which is how raiders lose an Eternal on the way home.
- The Index pays on first discovery. Completing the Beach collection paid $190.08k, and a later batch paid about $1.16M in the recorded runs.
- Hatch time tracks rarity. Starter eggs open in one to two minutes, mid-game eggs in seven to nine minutes, the Eternal Void Phoenix in 1 hour 24 minutes, and the Poseidon Trial Egg in 2 hours 59 minutes.
- Never be greedy on a contested nest. Grabbing one egg and returning beats stacking two and losing both — the egg stealing route guide breaks down the return paths.
Recommended Unlock Order
- Farm the Forest Zone pen first. Load every slot with Chicken and Brown Mouse pets and claim the Index entries before spending anything. New players should start with the beginner walkthrough if the flight controls are still unfamiliar.
- Push the Beach Zone with early wings. It is the cheapest place to learn mutation values, and the first 1.1x stamina wing tier (Bamboo Wings) covers the gap comfortably.
- Clear the Desert Zone at 34 stamina. The sign marks the gate, and the Lion Egg pool is the first meaningful cash jump.
- Add stamina upgrades before the Arctic. The 46-stamina sign is honest here; a 36-stamina crossing works but leaves no margin for a second trip.
- Stop at the Volcano for your first Rebirth. Once wings carry you there, reset for the permanent multiplier described in the rebirth and offline cash guide before grinding further.
- Farm the Void Zone at night. Eternal Void Phoenix spawns appear after dark; use the wait to clear pens and bank cash for the next wing tier.
- Fill Cloudlands pens, then buy Angelic Wings. The Cloudlands cash/sec is what funds the 2.7x stamina tier; the full price ladder is in the all wings tier list.
- Finish in the Deep Ocean. Kraken, Narwhal and Poseidon Trial eggs are the endgame pen, and the highest offline income per slot is covered in the pet hatching guide.
If your cash is the bottleneck rather than stamina, the how to get cash guide covers the pen and Index side of the loop, and the working codes page lists the free group pet and daily spin that boost a fresh save.
Sources and Verification
Zone names, stamina signs, egg labels, rarity tags and cash-per-second values on this page come from footage recorded on version 1.2:
- RobloMine — +1 Wings For Eggs full playthrough (no commentary): Desert Zone nest run at 6:20, Cursed Dragon secret spawn and egg pool reset at 7:20, pen rarity and mutation labels at 13:00, Index egg claims at 13:20, Arctic Zone crossing at 14:00.
- Floppys Pro — NOOB TO PRO Got BEST EGG in +1 Wings For Eggs: Beach Zone entry at 3:01, Desert Zone entry at 3:31, Arctic Zone 46-stamina crossing at 5:02, Volcano Zone at 8:03, Void Zone at 8:34, Cloudlands Zone at 12:34, Deep Ocean Zone at 13:04, 15% Splash mutation note at 14:07, Eternal Void Phoenix at 15:36, Angelic Wings at 2.7x stamina, 20:08, Trials of Poseidon at 23:17.
Spotted a newer area or egg that is not listed? The fastest-moving parts of this page are the zone gates and the event pools, so check the date on the game version badge before trusting a threshold.
Related Articles
guides
How to Get Cash in +1 Wings For Eggs: Upgrade Order
The fastest ways to get cash in +1 Wings For Eggs: per-second pen income, which upgrade to buy first, free rewards and a repeatable egg farming loop.
guides
How to Steal Eggs in +1 Wings For Eggs: Rare Egg Routes
Learn how to steal eggs in +1 Wings For Eggs without falling in lava: stamina budgeting for the flight home, carry limits, rare nests and a repeatable route.
guides
Best Pets to Farm Cash in +1 Wings For Eggs: Hatch Guide
How hatching works in +1 Wings For Eggs: egg rarity and timers, pen and carry capacity, cash per second for every animal tier, and which pets to keep or sell.
Was this helpful?
Thanks for the feedback!